Posts Tagged ‘wedding dress’

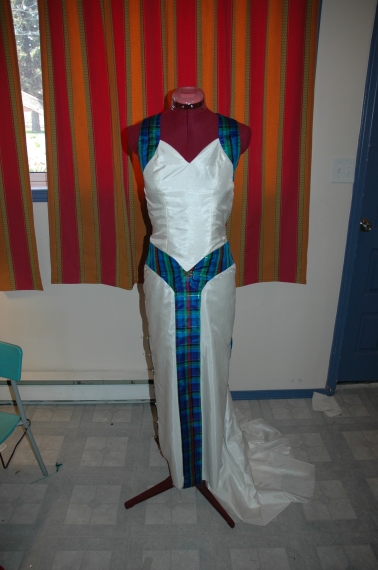
Completed wedding dress!

Yay! I’m finished!  Now I need to get the dress dropped off before Friday night and keep my fingers crossed for a positive outcome from the competition.  🙂

I encountered a few snags, some I overcame and some I have to live with.  There were quite a few pick marks and tiny holes that I couldn’t do anything about.  They don’t detract from the dress and are not noticeable (except to me, anyhow) so I left them.  It would have been too awkward to cover them.  I did have to deal with the couple of stains on the bodice, I couldn’t ignore them.  I added lace to the bodice and added some of the beads and sequins I took from the original lace.  It wasn’t a mirror image design in the lace so I couldn’t make a perfectly symmetrical design from the flowers.  I opted to try for more of a non-specific design and I hope it doesn’t appear as though it was just added for the sake of adding it.

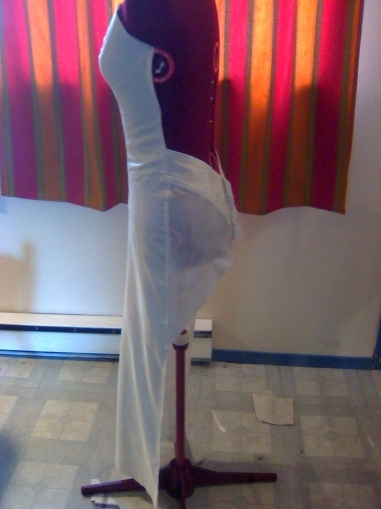
I had had an earlier problem of the sides of the dress sticking out.  I’ve somewhat solved the problem by removing the armhole thingys and re- attaching to take up the slack.  I think it is more of a design problem though and in the future I will probably take a different approach to the whole backless dress idea.

I also had originally made some really pretty organza flowers that I wanted to put on the dress.  I had added a cluster on the bodice, a cluster at the top of the train and one of the ends of the ribbon ties.  However, I found that they just didn’t fit.  Once I removed them, the dress seemed ‘finished’ so I’m happy to share the results.

Dress Front

DSC_0047

Detail of Dress Front

DSC_0045

Dress back

DSC_0041

Detail of armhole thingys and the lacing. 😀

DSC_0043

Detail of lace flowers on end of ribbon ties.

DSC_0044

If all goes well I’ll have some professional photos of the dress to show you. 😀  Wish me luck for the competition!

Dress Update #4

I’ve hit a mild snag.  I have the plaid fabric on the dress and will be able to put the train on very soon.  I was having some trouble with the zipper.  First it was a bit short which meant that the wearer would have wiggle a little to get in.  Then there was an issue with how I put it in.  I tried to do a centered zipper but found that it didn’t really look that nice and also noticed that the back had stretched a bit, causing some gaping.  So I made some adjustments to give allowance for a longer zipper and reinforced the back so it wouldn’t stretch.  The plaid fabric just needs to be stitched on, by hand, now.

My snag is that now that everything is just about together I’ve noticed that the sides of the top are not sitting right.  I’m not sure how to fix this at the moment, I’ll have to think about it.  Right now my focus is to get the plaid fabric and the train on.  I have just over one week left to finish this dress in order to get it into the competition.

dressfront

dressback

dressside

Dress update #3

Well, it is coming together, slowly but surely and I envision it will be awesome when it’s done.  I’ve got the front of the skirt and top portion of the back on.  Next step is adding the plaid strips to the waist, center front and center back.  I’ve started working on the armhole things…which I should figure out a name for so I don’t continually call them things or thingys though it does convey my message.

here are photos of the front, side and back.  I almost have all the plaid ready to put on but I think it’s going to be a lot of hand sewing since I don’t want any top stitching.  (That could change depending on my mood though. 😀 )

Oh, and one pic of my boy.  I can’t have the camera out without taking his picture, he is a bit of an egotist I think. ;D

dressfront

dressside

dressback

theboyand just in case you were wondering, yes those are boots he’s wearing with his swim trunks which he put on backwards because he likes the pocket.  lol!

Dress Update #2.5

OK, just a quickie today.  I’m super busy for the weekend but wanted to show you the fabric I’m using for the coloured area’s of the dress.  My friend gave me this piece of plaid taffeta that is so amazing in colours.  I can’t wait to get the dress together so i can start adding this fabric to it.  I am also trying to think of ways to embellish the dress.  Since the lace is pretty much destroyed and removing it has left some tiny holes that need to be covered up,  I was thinking of making a design using very skinny bias strips of the plaid fabric to embellish the bodice and skirt.  Another thought I had was to make fabric flowers.  I want to do something light and fluttery so I found this tutorial by Reese Dixon and I think it would be perfect.  I am definitely going to give this a go and even if I don’t use it for the dress, I’ll have some pretty awesome fabric flowers to decorate something else with.

I have to add some length to the skirt as well so I’m hoping I will have enough fabric to make a wide hem.  I think that is about it for now.  Keep visiting for more updates over the next few days!

0502091104aThis picture really doesn’t do the fabric justice.  The colours are so much deeper and richer than they appear here.

Dress Update #2

I’ve progressed to putting the skirt on the dress.  at this point I need to cut out/trim all my pieces and then I’ll get to sewing them.  I am hoping that I have enough fabric here that I won’t need to purchase anything.

One thing I have found is that I’m going to have to find or make lace or something to put on the bodice of the dress as there are tiny little holes left from where I removed the old lace.  It’s too bad it didn’t survive, I was really hoping to reuse some of it.

Anyhow, here are some pictures of the bodice pinned back on and the skirt on the bodice.  I’ve only done one side of the back and I won’t show you pictures of the train on it yet because the dress really needs to be sewn together so the seams are sturdy enough to handle the weight.

0429091911aThe bodice trimmed and better fitted.

0429091912aSide view of the bodice.

0429091912bBack view.

0429092206aSorry for the not so great pictures but you can see the front of the skirt pinned on.

0429092206bThis is the back.  the train will be put into the space and I will be adding strips of coloured satin to it as well (in the front too actually)

Dress Update

I decided that maybe I could share some pictures of the inspirations I will be using for my wedding dress remake.  I’m even going to let you see my sketch, just promise not to laugh.  It was drawn really quick and with pencil and my scanner isn’t working right so I had to take a picture of it (on my cell phone no less).

Anyhow, I decided that this dress would be my main inspiration:

colorwd032colorwd032a

I love the idea of colour in a wedding dress.  I think it really sets a dress apart from the usual white.  I don’t care much for the silhouette of the dress, at least not for my dress since I don’t feel I could make this shape work with the fabrics I have available to me so I’m going to go with a slimmer skirt.  Here is my sketch.  I don’t know how clear it will be to everyone but perhaps when you look at the other inspiration photo’s it will make sense.

0429091805a

The main portions of the dress will be out of the off-white taffeta that was the original dress.  I’m going to slim down the skirt but create a fishtail train in the back.  The front will still have that awesome sweetheart neckline but I’m planning to add sleeveless armholes (sorry i can’t think how else to describe it) that will hook in the back.  The back will be open and the skirt will have a zipper in the back.  I’m going to add strips of colour (the darker portions of the sketch) around the armholes, waist, front and back of the skirt.

Here’s the dress in pieces:

0429091329a0429091330a0429091330b0429091331a0429091329b0429091330c

These are the photo’s I’m using as inspiration for this dress.  This first one is actually the third dress that can be used as inspiration for the competition.  I’m sure you will see how each of these have given ideas for different aspects of my sketch.

dress-c

claire-pettibone-rock-n-roll-bride-wedding-dresses-55

n63

wp03b2c523

So far I’ve removed most of the lace and beads from the top part of the dress.  I plan to use the beads again but the lace didn’t survive very well so I don’t think I’ll be able to use it.  I’ve already started working on the bodice.  here are a couple of photo’s of it pinned on the dress form.  Right now I’m just trimming it up and will start work on the skirt when the top is pinned back on the dress form.

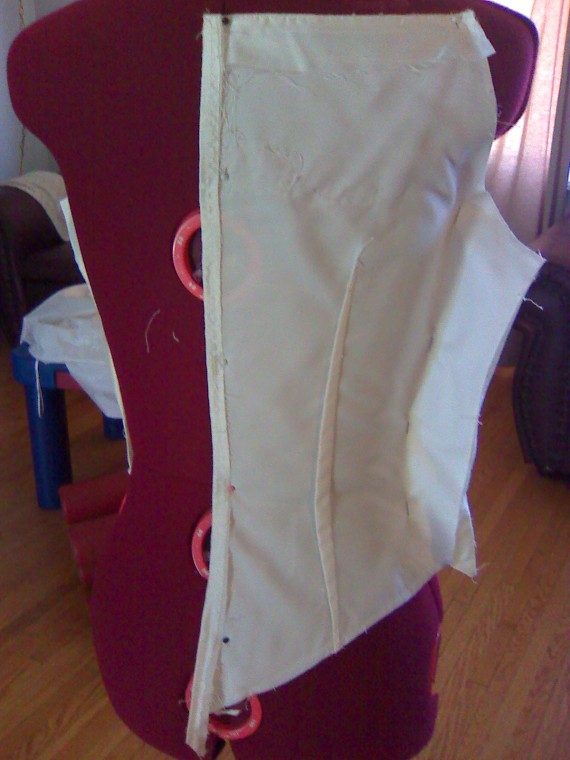
0429091422aA view of the princess seam pinned to fit the size of dress form I’m using.

0429091423bA front view of the side seam pinned out.

0429091423cA back view of the side seam pinned out.

after the fit of one side was what I wanted, I drew the new seam lines on with pencil and marked where I want to cut the back of the top out.  Then I carefully ironed the pieces flat and trimmed the excess fabric.  The front was folded in half so that the other half I didn’t fit on the dress form would be the same and the back piece that I marked also becomes a pattern piece for the other side.

Remake, Redo, Reuse

Perhaps I’m just inspired by earth day, or maybe I’m just inspired in that ‘special’ way but I’m in the mood to recreate stuff.

I’m in a craft show this weekend called Bloomin’ Earth and it’s at the Kitchener Market downtown.  It’s actually more of a earth-day festival and you can get all the info by clicking on this link – BLOOMIN’ EARTH.  The whole show revolves around handmade and the three R’s (reduce, reuse, recycle) so it’s going to be a great show for all ages.

I make a line of kids clothing called Punkn’s Alternative Clothing.  I take a combination of new and recycled fabrics and findings and turn them into really cute onesies, t-shirts, bibs etc and that’s what I’ll be selling there.

Anyhow, on to the real subject of this post.

I was recently emailed information about a competition and a photo shoot opportunity.  Two separate events but the subject is the same.  They are looking for remade wedding dresses.  The photo shoot is pretty loose as far as what they are looking for and for budget.  They want some designers to take an old thrift-ed wedding dress and make it into something edgy and high fashion.  The competition is similar but more rules.  They have three photo’s posted and each entrant is to use one of those photo’s as inspiration for their re-design.  The budget is $75 and that includes the cost of the dress.

I was lucky enough to have a wonderful person from Kitchener Freecycle donate a dress to me.  (if you aren’t familiar with Freecycle, you can check it out here to find your local chapter: http://www.freecycle.org/)  Now I just need to sit down and decide how I’m going to remake it.  I plan to use only things that I already have and keep my budget as close to $0 as possible since the amount spent on the dress is one of the judging criteria.  I will try to take pictures as I progress and post them here for you to see.  For now, here’s the dress in it’s original glory.

0422090833a0422090833c

My other new project is sewing a new bra.  I hate bra shopping.  I am the type to go maybe once every three years to buy a new bra because once I’ve found one that fits, I don’t want to try on any more.  (Usually about that time my kids are running around like crazy people, hiding in the displays and sneaking peeks in the change rooms so you can understand my haste in bra shopping or any shopping for that matter)  Well, the last one I bought was so nice and comfortable you can imagine my dismay when I pulled it out of the washer and the strap was no longer connected to the bra.  And I know what you are all saying, but when you have to do at least one load of laundry each day, sometimes 2 or 3, ‘hand wash’ and ‘lingerie bag’ are just not part of your vocabulary. You can see the damage in the picture below.

0422090834a

So, yesterday my friend and I made a trip to Hamilton.  We were told about how great the fabric shopping is there and all the deals and such so we decided it was time to check it out.  Before I left to pick up my friend I went online to check out the fabric shops so I knew exactly what area we were going to.  One of the sites that came up was The Bra Makers Supply.  Now, I’ve been to their website before and always wanted to buy stuff from them to try making my own bra but I hesitated because I didn’t really know what I needed and how much.  Well, to my suprise and delight, they are located in Hamilton!  I plotted out their location so if we had time, we could stop in and check it out.

The first thing you notice about Bra Makers Supply is it’s not your usual fabric store.  Infact, it’s located in more of an office setting.  All the bra findings, notions, fabrics and patterns are neatly laid out on the shelves.  The woman that helped us was Beverly Johnson.  If you don’t know the name, she is the expert at making bras.  She owns the shop, she has written manuals, she sources out the best patterns and supplies, she designs bras and she teaches classes.  She let us wander around and check things out for a bit and then approached us to find out what we were really looking for.  So I explained my dilemma and that although I could just reattach the strap to my bra, I felt it might be time to consider re-making it since it was obvious that it’s getting time to retire it.  I had tried to make my own from a pattern once and it was not good.  For some reason the idea of making a bra from scratch was extremely intimidating.  Mostly it was the fitting process and the lack of available notions.  Did you know that there are three standard lengths of wire and that you can get them in plastic?  Me either.  I’m pretty sure Fabricland just has one length and only in the metal wire type.  They also have around 100 sizes of bra patterns (yeah I was a bit stunned to hear that too).

Remaking a bra using one that I knew fit seemed less intimidating.

Anyhow, after discussing my old bra and what I was looking for in my new bra she helped me pick out fabric and make sure that I had all the proper notions.  She even told me that if I was having trouble I could call or email them, or if at all possible, I could come in with my bra and sewing machine and she would help!  That last part floored me.  When was the last time the staff at the local fabric store told you to bring all your stuff in and they would help you if you had trouble putting your sewing project together?

So I made a decision that I would try this.  I purchased everything that I needed in order to make one bra and it cost me just under $25(that’s with taxes for all you Ontario readers).  I have enough fabric though to potentially make 2 bras so if the first one works out I can either go back or order the findings from them online to make a new bra.  They also ship worldwide if you aren’t as lucky as me to live close by.

I’m so excited to get started and I will try to get pictures of the progress of this project too so you can perhaps be inspired to try it yourself, or maybe I can do it for you. 😀

Thats all for now, have a great Earth day, Earth week, Earth year!!